Category Archives: Uncategorized

Configuring MVC 4 with StructureMap

I started a new MVC4 project and wanted to use StructureMap for my IOC container of choice. I followed Phil’s post about wiring up dependency resolvers in mvc 4, but I kept getting the following error: “StructureMapDependencyResolver does not appear to implement Microsoft.Practices.ServiceLocation.IServiceLocator.
Parameter name: commonServiceLocator”

Took a little digging, but I found the CommonServiceLocator project from the Microsoft Patterns and Practice group.  That project has a StructureMap implementation of the IServiceLocator interface for StructureMap.  After I installed the CommonServiceLocator nuget, I was able to reference IServiceLocator in my code.   Taking the code from the CommonServiceLocator implementation, I ended up with the following:

The following code will setup mvc to use structuremap as the dependency resolver. Add the webactivator nuget and toss the following file in your app_start folder:

using System.Web.Mvc;
using MvcKickstart.Infrastructure;
using StructureMap;

[assembly: WebActivatorEx.PreApplicationStartMethod(typeof(YourProject.IocConfig), "PreStart", Order = -100)]

// This gets installed automatically with the MvcKickstart nuget (https://nuget.org/packages/mvckickstart)
namespace YourProject 
{
  public static class IocConfig
	{
		public static void PreStart() 
		{
			// If changes need to be made to IocRegistry, please subclass it and replace the following line
			ObjectFactory.Initialize(x => x.AddRegistry(new IocRegistry(typeof(IocConfig).Assembly)));
			DependencyResolver.SetResolver(new StructureMapDependencyScope(ObjectFactory.Container));
		}
	}
}

Hope this helps someone looking to do the same!

Access the wordpress browser check api from asp.net

New versions of WordPress have a pretty handy widget included with the admin dashboard.  The widget checks the version of the browser that the user is running (via the user agent) and alerts them if it is insecure (ie6) or has an upgrade (Firefox 3.x).  I wanted to include a similar widget with Acturent and if possible, take advantage of their service api.

After a short time tinkering, I have a nice c# wrapper to their api.  The code below uses a class called BiaCache that is basically a wrapper around System.Web.Cache or an in-memory dictionary, based on if System.Web.Cache exists.  A slight modification will be needed based on your usage.  I cache the results for a week, based on the user agent.

To deserialize the string that comes back from the WordPress service, I found the Sharp Serialization Library works well.

Basic usage for my helper is:

var browserInfo = new HappyBrowsingHelper().GetBrowserInfo(Request.UserAgent);

The results from the web service get stored in a model object called BrowserInfo:

public class BrowserInfo
{
  public string Name { get; set; }
  public string Version { get; set; }
  public string Url { get; set; }
  public string ImageUrl { get; set; }
  public string CurrentVersion { get; set; }
  public bool HasUpgrade { get; set; }
  public bool IsInsecure { get; set; }
}

The helper method to make the service call is as follows:

public BrowserInfo GetBrowserInfo(string userAgent)
{
  if (string.IsNullOrWhiteSpace(userAgent))
    return new BrowserInfo();

  var key = "__GetBrowserInfo_" + userAgent;
  var item = BiaCache.Get<BrowserInfo>(key);
  if (item == null)
  {
    string serializedResponse = null;
    try
    {
      var postData = "useragent=" + userAgent;

      var request = WebRequest.Create("http://api.wordpress.org/core/browse-happy/1.0/");
      request.Method = "POST";
      request.ContentType = "application/x-www-form-urlencoded";
      request.ContentLength = postData.Length;
      using (var writeStream = request.GetRequestStream())
      {
        var encoding = new UTF8Encoding();
        var bytes = encoding.GetBytes(postData);
        writeStream.Write(bytes, 0, bytes.Length);
      }

      using (var response = request.GetResponse())
      {
        using (var responseStream = response.GetResponseStream())
        {
          using (var reader = new StreamReader(responseStream, Encoding.UTF8))
          {
            serializedResponse = reader.ReadToEnd();
          }
        }
      }

      var serializer = new PhpSerializer();
      var result = (Hashtable) serializer.Deserialize(serializedResponse);
      item = new BrowserInfo
          {
              Name = ToStringOrNull(result["name"]),
              Version = ToStringOrNull(result["version"]),
              Url = ToStringOrNull(result["update_url"]),
              ImageUrl = ToStringOrNull(result["img_src_ssl"]),
              CurrentVersion = ToStringOrNull(result["current_version"]),
              HasUpgrade = (bool) result["upgrade"],
              IsInsecure = (bool) result["insecure"]
          };

      BiaCache.Add(key, item, (int) TimeSpan.FromDays(7).TotalMinutes, System.Web.Caching.CacheItemPriority.AboveNormal);
    }
    catch (Exception ex)
    {
      Log.Fatal("Error getting browser info from wordpress :( nUser agent: " + userAgent + "nResult: " + (serializedResponse ?? string.Empty) + "nn" + ex, ex);
      item = new BrowserInfo();
    }
  }
  return item;
}

private static string ToStringOrNull(object o)
{
  return o == null ? null : o.ToString();
}

Thats basically about it…  Happy browsing!  You can download a demo project: HappyBrowsingDemo.

ProfileAttribute for MvcMiniProfiler

I’ve been using the MvcMiniProfiler quite a bit lately.  I put it in production with Acturent and I’ve contributed a bit to the project.  With Acturent, I came up with a simple ActionFilterAttribute that I’m using to auto inject the profiler to all actions in the application.  Rather than going through and specifically adding @MvcMiniProfiler.MiniProfiler.RenderIncludes() to each view, I just slap the following attribute on my base controller class:

public class ProfileAttribute : ActionFilterAttribute{
  public override void OnResultExecuted(ResultExecutedContext filterContext) {
    base.OnResultExecuted(filterContext);
    if (filterContext.RequestContext.HttpContext.Request.IsAjaxRequest()) return;
    var session = ObjectFactory.Container.GetInstance<IUserSession>();
    if (session != null) {
      var user = session.GetCurrentUser();
      if (user == null || !user.IsAdmin) return;

      var includes = MiniProfiler.RenderIncludes().ToString();
      using (var writer = new StreamWriter(filterContext.HttpContext.Response.OutputStream)) {
        writer.Write(includes);
      }
    }
  }
}

Obviously it will need a bit of tweaking if you implement it in your app.  Specifically, the user validation code should be swapped out with whatever logic you want to use to determine who sees the profile information.

4-Hour Body – My Personal Results

Overview

Over the last month, I have been on the 4-Hour Body diet.  I read the book over the holidays and wanted to prepare for a trip to Mexico, this winter.  I have never really gone on a formal diet before and have long believed that it is the amount of food you eat, not what food.  Americans tend to WAY over eat, consuming typically two portions or more per meal.

My Results

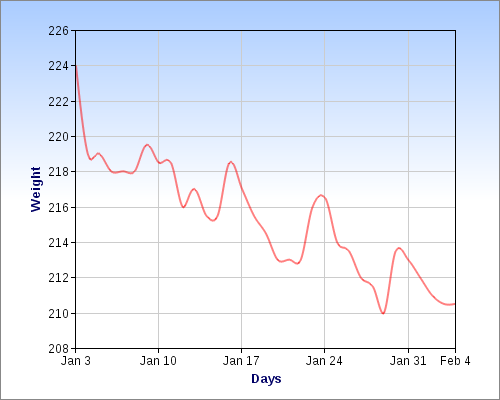
Mileage may vary, but I am very happy with the results.  Overall, I am down around 14 pounds since starting the diet and have increased muscle mass.  More importantly, I feel better.  Not bad for 4 & 1/2 weeks.  It’s hard to explain until you’ve been through it, but I don’t feel as sluggish.  I did all of this without stepping on a treadmill or eating a salad.  I put together a handy graph to show my weight loss:

What have I learned?

I now know how to cook dry beans and how to make them a delicious side dish.  I can make a very good guacamole from scratch, without using flavor packets or a specific recipe.  I’m beginning to feel more conscious about the types of food that I put in my body on a daily basis and hopefully less likely to snack because I’m bored.  My hardest day was the first day of the diet.  I felt like I could eat everything and still not feel satisfied.  That feeling diminishes over time or you just get used to it – not really sure.  Now that I’ve done this diet for a couple weeks, I can say that it is a breeze once you get through the first day or so of each week.

Conclusion

This diet worked well for me.  I think part of the reason it worked so well was that I knew it was only a temporary situation.  It’s not a fun diet, but I doubt you will find any fun diets out there that produce positive results.  I have gotten used being on the diet and will likely incorporate a modified version of it into my daily life.  I would definitely recommend the 4-hour body to anyone who asks.  I hope to soon post some recipes that I used throughout the past month.  I will leave you with then and now pictures (Then on the left, Now on the right).

Then
Now

Localize Asp.Net MVC Views using a LocalizedViewEngine

Localizing content is never an easy task.  Asp.Net tries to make localization and globalization easier with built in support for resources and cultures.  While I think that is a good start, I feel that the typical localization technique for asp.net applications is slightly misdirected and could be implemented easier.

In the past, I’ve put every sentence into a culture specific resource file.  Those sentences may be composite format strings or they could just be fragments.

This not only makes it difficult to rapidly develop, but can also create some rather difficult situations when special characters are introduced.  Think percent signs and currency symbols on Edit views.  Not to mention getting right-to-left languages like Arabic to display nicely.

A different approach

I propose a different solution to resource files that contain string fragments.  Rather than piecing together views with resource fragments, why not just have one view per language, per action.  Each language specific view can be identified by including culture names in their file name.

So if you have an Index action on the Home controller and want to support the default language (en-US) and Japanese (ja-JP), you would have the following files:

/Views/Home/Index.aspx
/Views/Home/Index.ja-JP.aspx

An added benefit to this method, is that it allows you to add new translations to your web application without requiring a recompile.  Along those lines, you can incrementally translate your site as budget and time allow.  If you haven’t added a translated view yet, the view engine will fall back on the default language view.

What are the downsides?

While this all sounds like a nice solution, there is one major downfall.  You duplicate the markup in many places.  So if or when you make a change in the future, you’ll have to go through each language specific view and make the change there as well.  That’s a lot to ask of a developer, but I feel that this method outweighs trying to piece together fragments and maintain text outside of the view.

How is this accomplished?

As everyone is aware, Asp.net MVC allows developers to extend the framework rather easily.  To allow for language specific views, we just need to tweak the WebFormViewEngine to first check for the view of the CurrentUICulture.  If that page is not found, let the view engine continue as it normally would.

public class LocalizedWebFormViewEngine : WebFormViewEngine
{
public override ViewEngineResult FindPartialView(ControllerContext controllerContext, string partialViewName, bool useCache)
{
string localizedPartialViewName = partialViewName;
if (!string.IsNullOrEmpty(partialViewName))
localizedPartialViewName += “.” + Thread.CurrentThread.CurrentUICulture.Name;

var result = base.FindPartialView(controllerContext, localizedPartialViewName, useCache);

if (result.View == null)
result = base.FindPartialView(controllerContext, partialViewName, useCache);

return result;
}

public override ViewEngineResult FindView(ControllerContext controllerContext, string viewName, string masterName, bool useCache)
{
string localizedViewName = viewName;
if (!string.IsNullOrEmpty(viewName))
localizedViewName += “.” + Thread.CurrentThread.CurrentUICulture.Name;

string localizedMasterName = masterName;
if (!string.IsNullOrEmpty(masterName))
localizedMasterName += “.” + Thread.CurrentThread.CurrentUICulture.Name;

var result = base.FindView(controllerContext, localizedViewName, localizedMasterName, useCache);

if (result.View == null)
result = base.FindView(controllerContext, viewName, masterName, useCache);

return result;
}
}

To specify that you would like to use the LocalizedViewEngine, modify the Application_Start method in your Global.asax.cs file to be similar to:

protected void Application_Start()
{
AreaRegistration.RegisterAllAreas();

RegisterRoutes(RouteTable.Routes);

ViewEngines.Engines.Clear();
ViewEngines.Engines.Add(new LocalizedWebFormViewEngine());
}

That’s it.  I’m interested in hearing your thoughts about this method.
Get jQuery intellisense in VS.Net when using a CDN

I recently heard about this technique to get jQuery intellisense working in Visual Studio .Net.  jQuery intellisense traditionally has never worked properly for me because I don’t use <head runat="server"> and thus don’t link to javascript files the MS way.  Most of the sites I build today just reference jQuery on a CDN like Google or Microsoft and that breaks Visual Studio’s ability to find the associated vsdoc.js file.  This works, however:

Add the following line to your master page file in the <head> element area under your normal jQuery script tag.

<% /* %><script type="text/javascript" src="http://ajax.microsoft.com/ajax/jQuery/jquery-1.3.2-vsdoc.js"></script><% */ %>

That line wraps the script tag in comments, so the script tag never gets rendered on the client side.  Visual Studio sees a valid file, though, and provides intellisense based off the comments in that file.  Below is a full example page layout:

<!DOCTYPE html PUBLIC "-//W3C//DTD XHTML 1.0 Transitional//EN" "http://www.w3.org/TR/xhtml1/DTD/xhtml1-transitional.dtd">
<html xmlns="http://www.w3.org/1999/xhtml">
<head>
  <title>Example jQuery Intellisense</title>
  <script type="text/javascript" src="http://ajax.googleapis.com/ajax/libs/jquery/1.3/jquery.min.js"></script>
  <% /* %><script type="text/javascript" src="http://ajax.microsoft.com/ajax/jQuery/jquery-1.3.2-vsdoc.js"></script><% */ %>

  <!– Add your own javascript here –>

</head>
<body>
   Do work son
</body>
</html>

Balsamiq

I heard about Balsamiq recently and figured I’d pass it along.  It’s a nice tool for quickly creating screen mockups.  After playing with it for about 5-10 minutes this morning, I’ve got to say that I’m impressed.  I definitely think it is a nice alternative to using powerpoint.  It is an Adobe AIR application which means that it’ll run on mac, windows, or linux.  They even allow you to test it out online, at their website.  Check it out!

Disclaimer: This is a bit of an ad, to get a free license, but look through this blog and show me where else I blog about other people’s products.  It’s not very often, so believe me when I say that this one is worth it!

IIS7: How to quickly and easily optimize your website using GZip compression

DmbStream is starting to gain some momentum and I want the site to be received as fast as possible. It has over 1,100 registered users now, so every little optimization helps.  I used YSlow to pinpoint some of the major issues with the site and it really shed some light on the bottlenecks.

The first thing I did was use Google to host jQuery. This is an obvious win… The more sites that use Google to host their ajax libraries, the greater the possibility that the user will already have that library in their browser cache. Plus it offloads about 60k of javascript to Google’s CDN for each virgin request.

After that, YSlow said that javascript files were not getting gzip compressed. I have DmbStream hosted with IIS7, so things *should* be easy to configure. After reading this article, I added the following to the <system.webServer> element in my web.config file:

<staticcontent>
    <remove fileextension=".js" />
    <mimemap mimetype="text/javascript" fileextension=".js" />
</staticcontent>

Finally, the html output needed some compression. Once again, IIS7 makes this pretty simple to configure once you find the magic elements to add to the web.config. This article gives a good overview of the elements to add to web.config while this article describes using iis7 dynamic compression with output caching.

For my needs, I just added the following to the web.config <system.webServer> element:

<urlcompression dodynamiccompression="true"></urlcompression>

So what are the results?

Original:
Empty browser cache: 123.2K
Primed browser cache: 48.5K

Enabling gzip and dynamic content caching:
Empty browser cache: 80.3K
Primed browser cache: 9.5K

That’s a reduction in size of 35-80% per request. Port80 says that these improvements speed the site up 6.1 times. Not too bad, for just adding a few lines to the a web.config.

I have some other tweaks that I’ll continue playing with (it looks like .gif files aren’t being compressed), but by far the most useful compression came from turning dynamic compression on. In other terms, compressing the generated HTML output.

If you’re looking for some more reading material regarding IIS7 compression, I recommend checking out this post as well.

Helper to access route parameters

I had a need to access routing information that was not readily accessible (as far as I could discover).  So, I wrote this helper to allow me to get the string, object pairs that Routing parses from the URL:

using System;
using System.Collections.Generic;
using System.Web;
using System.Web.Routing;

namespace BiaCreations.Helpers
{
    public class RouteHelper
    {
        private static IDictionary<string, object> _values;
        public static IDictionary<string, object> GetRouteInfo(HttpContext context)
        {
            if (_values == null)
            {
                HttpContextBase contextBase = new HttpContextWrapper(context);
                RouteData data = RouteTable.Routes.GetRouteData(contextBase);

                RequestContext requestContext = new RequestContext(contextBase, data);

                _values = requestContext.RouteData.Values;
            }
            return _values;
        }

        public static T GetRouteInfo<T>(HttpContext context, string key)
        {
            IDictionary<string, object> data = GetRouteInfo(context);

            if (data[key] == null)
                return default(T);

            object objValue = data[key];
            // It appears that route values are all strings, so convert the object to a string.
            if (typeof(T) == typeof(int))
            {
                objValue = int.Parse(data[key].ToString());
            }
            else if (typeof(T) == typeof(long))
            {
                objValue = long.Parse(data[key].ToString());
            }
            else if (typeof(T) == typeof(Guid))
            {
                objValue = new Guid(data[key].ToString());
            }
            return (T)objValue;
        }
    }
}

There are probably better ways to do this, but I needed this functionality and this works.  I am open to suggestions, though, if you have a better way of accomplishing this.  Oh, and my use case for needing this was that I needed value of the "id" parameter passed to a view, within an asp:substitution callback function.  I know that doesn’t completely follow the MVC philosophy, but you have to work with what you’re given, and sometimes it’s worth bending rules for the benefits that output caching can provide.

Migrate email from Gmail to Google Apps

I, among others, have searched for a solution to transfer email in my gmail account to my google apps email.  There isn’t a formal way of doing so via Google, but low and behold I stumbled across a way to do it with Linux!  Consider this an addendum to that post, with complete instructions for those not familiar with linux.  I wanted to keep all of the labels, stars, read status, and email date.  As an added bonus, this method allows you to change the recipient value on emails so that it shows that it came from “me” rather than your gmail address.  I used Amazon EC2 to work the magic for me and 46k emails later, I’m a happy google apps user 🙂    You can just as easily use your own linux box alternatively.

This is how you can transfer your email from Gmail to your Google Apps email:

  1. Log into Amazon EC2 and select a Fedora instance.  It doesn’t really matter which instance you use.  I used “Basic Fedora Core 8 (AMI ID: ami-5647a33f)”
  2. Follow the example video on Amazon’s website for how to SSH into your instance
  3. Log in as root
  4. Install imapsync by running “yum install imapsync”
  5. Edit a script by running “nano run-imapsync”
  6. Paste in the following:
    imapsync –host1 imap.gmail.com
    –port1 993 –user1 user@gmail.com
    –passfile1 ./passfile1 –ssl1
    –host2 imap.gmail.com
    –port2 993 –user2 user@domain.com
    –passfile2 ./passfile2 –ssl2
    –syncinternaldates –split1 100 –split2 100
    –authmech1 LOGIN –authmech2 LOGIN
    –justfolders

    imapsync –host1 imap.gmail.com
    –port1 993 –user1 user@gmail.com
    –passfile1 ./passfile1 –ssl1
    –host2 imap.gmail.com
    –port2 993 –user2 user@domain.com
    –passfile2 ./passfile2 –ssl2
    –syncinternaldates –split1 100 –split2 100
    –authmech1 LOGIN –authmech2 LOGIN
    –regexmess ‘s/Delivered-To: user@gmail.com/Delivered-To: user@domain.com/g’
    –regexmess ‘s/<user@gmail.com>/<user@domain.com>/g’
    –regexmess ‘s/Subject:(s*)n/Subject: (no–subject)$1n/g’
    –regexmess ‘s/Subject: ([Rr][Ee]):(s*)n/Subject: $1: (no–subject)$2n/g’

    Replace name@gmail.com with your Gmail address and name@domain.com with your Google Apps email address

  7. Press Control-x to save the file and quit nano
  8. Make the script executable by running “chmod 744 run-imapsync”
  9. Create a file containing your Gmail password by running “nano passfile1”
  10. Type in your Gmail password and press Control-x to save the file
  11. Create a file containing your Google Apps password by running “nano passfile2”
  12. Type in your Google Apps password and press Control-x to save the file
  13. Execute the script by typing “./run-imapsync”

Depending on the size of your mailbox, you’ll have nirvana in a few hours 🙂  Transfering my 46k emails weighing in around 2.5Gb took roughly about a day… I had to babysit the process because it failed after a while for some unknown reason.  But restarting it with the specified –maxage param will get you right back near where you left off.  You may notice that I call imapsync twice in my script file.  It was failing on messages that had multiple labels and the folders weren’t created yet.  So the first call creates all of the folders while the second call moves all of the messages.