HtmlHelper DropDownList for Enumerations

I’ve really been enjoying the html helpers baked into the ASP.Net MVC framework. To compliment the SelectList extensions that I use, I often use this extension as well.  It displays a drop down of enum values for the specified property.  It will attempt to get the name via the DisplayAttribute.  If the attribute is not present, then it will just get the name from the enum value.

I created an extension method to get the Name of an enum value (as described above):

private static readonly Dictionary<Enum, string> NameCache = new Dictionary<Enum, string>();
public static string GetName(this Enum type)
{
  if (NameCache.ContainsKey(type))
    return NameCache[type];

  var enumType = type.GetType();
  var info = enumType.GetField(type.ToString());
  if (info == null)
    return string.Empty;

  var displayAttribute = info.GetCustomAttributes(false).OfType<DisplayAttribute>().FirstOrDefault();
  var value = string.Empty;
  if (displayAttribute != null)
    value = displayAttribute.GetName() ?? string.Empty;

  NameCache.Add(type, value);

  return value;
}

I then make use of that extension with the enum dropdown helper:

public static MvcHtmlString DropDownListForEnum<TModel, TProperty>(this HtmlHelper<TModel> htmlHelper, Expression<Func<TModel, TProperty>> expression)
{
  return htmlHelper.DropDownListForEnum(expression, null, null);
}
public static MvcHtmlString DropDownListForEnum<TModel, TProperty>(this HtmlHelper<TModel> htmlHelper, Expression<Func<TModel, TProperty>> expression, object htmlAttributes)
{
  return htmlHelper.DropDownListForEnum(expression, new RouteValueDictionary(htmlAttributes));
}
public static MvcHtmlString DropDownListForEnum<TModel, TProperty>(this HtmlHelper<TModel> htmlHelper, Expression<Func<TModel, TProperty>> expression, IDictionary<string, object> htmlAttributes)
{
  return htmlHelper.DropDownListForEnum(expression, null, htmlAttributes);
}
public static MvcHtmlString DropDownListForEnum<TModel, TProperty>(this HtmlHelper<TModel> htmlHelper, Expression<Func<TModel, TProperty>> expression, string optionLabel)
{
  return htmlHelper.DropDownListForEnum(expression, optionLabel, null);
}
public static MvcHtmlString DropDownListForEnum<TModel, TProperty>(this HtmlHelper<TModel> htmlHelper, Expression<Func<TModel, TProperty>> expression, string optionLabel, object htmlAttributes)
{
  return htmlHelper.DropDownListForEnum(expression, optionLabel, null);
}
public static MvcHtmlString DropDownListForEnum<TModel, TProperty>(this HtmlHelper<TModel> htmlHelper, Expression<Func<TModel, TProperty>> expression, string optionLabel, IDictionary<string, object> htmlAttributes)
{
  if (expression == null)
    throw new ArgumentNullException("expression");

  var member = expression.Body as MemberExpression;
  if (member == null)
    throw new ArgumentNullException("expression");

  var selectedValue = string.Empty;
  var metadata = ModelMetadata.FromLambdaExpression(expression, htmlHelper.ViewData);
  if (metadata.Model != null)
  {
    selectedValue = metadata.Model.ToString();
  }
  var enumType = Nullable.GetUnderlyingType(member.Type) ?? member.Type;

  var listItems = new List<SelectListItem>();
  foreach (var name in Enum.GetNames(enumType))
  {
    var type = Enum.Parse(enumType, name) as Enum;
    listItems.Add(new SelectListItem
    {
      Text = type.GetName(),
      Value = name,
      Selected = name == selectedValue
    });
  }

  return htmlHelper.DropDownListFor(expression, listItems, optionLabel, htmlAttributes);
}

The beauty of this extension method is that it uses the DropDownListFor(…) helper baked into the framework already. So validation, etc is wired up for me. Also worth noting, this extension works with nullable and non-nullable properties. Hope this helps someone save some time…
4-Hour Body – My Personal Results

Overview

Over the last month, I have been on the 4-Hour Body diet.  I read the book over the holidays and wanted to prepare for a trip to Mexico, this winter.  I have never really gone on a formal diet before and have long believed that it is the amount of food you eat, not what food.  Americans tend to WAY over eat, consuming typically two portions or more per meal.

My Results

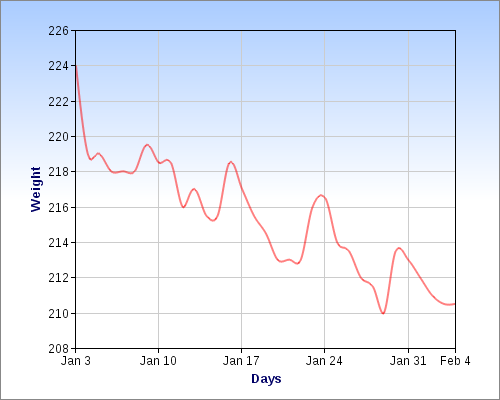
Mileage may vary, but I am very happy with the results.  Overall, I am down around 14 pounds since starting the diet and have increased muscle mass.  More importantly, I feel better.  Not bad for 4 & 1/2 weeks.  It’s hard to explain until you’ve been through it, but I don’t feel as sluggish.  I did all of this without stepping on a treadmill or eating a salad.  I put together a handy graph to show my weight loss:

What have I learned?

I now know how to cook dry beans and how to make them a delicious side dish.  I can make a very good guacamole from scratch, without using flavor packets or a specific recipe.  I’m beginning to feel more conscious about the types of food that I put in my body on a daily basis and hopefully less likely to snack because I’m bored.  My hardest day was the first day of the diet.  I felt like I could eat everything and still not feel satisfied.  That feeling diminishes over time or you just get used to it – not really sure.  Now that I’ve done this diet for a couple weeks, I can say that it is a breeze once you get through the first day or so of each week.

Conclusion

This diet worked well for me.  I think part of the reason it worked so well was that I knew it was only a temporary situation.  It’s not a fun diet, but I doubt you will find any fun diets out there that produce positive results.  I have gotten used being on the diet and will likely incorporate a modified version of it into my daily life.  I would definitely recommend the 4-hour body to anyone who asks.  I hope to soon post some recipes that I used throughout the past month.  I will leave you with then and now pictures (Then on the left, Now on the right).

Then
Now

Asp.Net MVC: SelectList extension methods

I wanted to share some extensions I use for dealing with the Asp.Net MVC select lists (DropDownList/ListBox) helpers.  Why the mvc helper apis are not more friendly in this area, I do not know…

Now some examples of how to use these extensions:

A single dropdown:

@Html.DropDownListFor(x => x.PropertyId, Model.AllProperties.ToSelectListItems(x => x.Name, x => x.Id.ToString(), x => x.Id == Model.PropertyId))

A multiselect dropdown:

@Html.ListBoxFor(x => x.PropertyIds, Model.AllProperties.ToMultiSelectListItems(x => x.Name, x => x.Id.ToString(), x => Model.PropertyIds.Contains(x.Id)))


Announcing FluentScheduler

Overview

Over the Thanksgiving Holiday, I created an open source project called FluentSchedulerFluentScheduler is a .NET 4 based task scheduler.  It allows you to run tasks/cron jobs from your application.  A fluent api is used to configure schedules for when to run each task.

Why?

In .NET land, I had previously used an xml based task scheduler that only allowed interval based task runtimes.  I wanted more of a .NET 4 way of doing things… With FluentScheduler, not only can you can use a class to represent a task, you can also define your task using a lambda expression.  I really wanted things to be flexible and not try to limit people with how they define their tasks.  Additionally, you can schedule your tasks to run at specific times as well as intervals.

There were many firsts for me with this project:

  • I enjoy using fluent apis, but I have never written one myself.  I figured this project would give me a nice opportunity to dive into creating a fluent interface for a product.  Getting fluent apis right is not easy… I hope you find the api I created to be logical and easy to use.
  • While I have worked on open source projects in the past, it has been a while.  I wanted to explore a different host than Sourceforge, so I chose CodePlex.  There are a lot of other .NET based projects hosted on CodePlex and the site gives project owners options for which source control system you would like to use.  These days, I prefer using Mercurial, which CodePlex offers as an available source control system.  So far, my experience with CodePlex has been excellent.  The tool is easy to use and quick to setup.
  • This is my first official NuGet library.  I have private NuGet packages, but FluentScheduler is part of the official Microsoft feed and available to everyone.

Examples

Detailed usage instructions are available here.  But to give you a taste of how easy this library is to use 🙂

// Schedule a complex task to run immediately and on a monthly interval
Schedule(() =>
	{
		Console.WriteLine("Complex Action Task Starts: " + DateTime.Now);
		Thread.Sleep(1000);
		Console.WriteLine("Complex Action Task Ends: " + DateTime.Now);
	}).ToRunNow().AndEvery(1).Months().OnTheFirst(DayOfWeek.Monday).At(3, 0);

How can I use it?

You can begin using FluentScheduler today by either adding it as a NuGet library package reference or by grabbing the assembly from the project release page.  Once you reference the assembly, please take a look at the documentation for how to configure things.

More Information…

If you’re interested in learning more about the project, check out the project’s homepage.  If you’re interested in contributing, please fork the project and start submitting pull requests 🙂

Creating NuGet packages with TeamCity

I wanted to create NuGet packages for some internal libraries that I use.  I came across this post that describes how to create a NuGet package with MSBuild, which got me the majority of the way.  I did have to make a few modifications to make it fit in nicely with my TeamCity CI server.

To begin, I installed the MSBuild Community Tasks to my build server.

After that, I grabbed the NuGet.MSBuild assembly from their CI server and copied it to the C:Program Files (x86)MSBuildNuGet folder.

Following Mark’s instructions, I created a NuGet folder for my project.  In that folder, I’m able to put my nuspec file and any transforms.  With current versions of NuGet, you need to make sure that you have proper namespaces added to the package and metadata elements:

<package xmlns:xsd="http://www.w3.org/2001/XMLSchema" xmlns:xsi="http://www.w3.org/2001/XMLSchema-instance">
	<metadata xmlns="http://schemas.microsoft.com/packaging/2010/07/nuspec.xsd">

I then added the following MSBuild file to my project:

<Project xmlns="http://schemas.microsoft.com/developer/msbuild/2003">
	<Import Project="$(MSBuildExtensionsPath)MSBuildCommunityTasksMSBuild.Community.Tasks.Targets"/>
	<UsingTask AssemblyFile="$(MSBuildExtensionsPath)NuGetNuGet.MSBuild.dll" TaskName="NuGet.MSBuild.NuGet" />

	<PropertyGroup>
		<AssemblyName>BiaCreations</AssemblyName>
		<PackagePath>C:Packages</PackagePath>
		<BuildConfiguration Condition="'$(teamcity_version)' == ''">Debug</BuildConfiguration>
		<BuildConfiguration Condition="'$(teamcity_version)' != ''">Release</BuildConfiguration>
		<build_number Condition="'$(teamcity_version)' == ''">1.0.0.0</build_number>
	</PropertyGroup>

	<Target Name="CreatePackage">
		<PropertyGroup>
			<PackageBuildPath Condition="'$(teamcity_version)' == ''">buildNuGet</PackageBuildPath>
			<PackageBuildPath Condition="'$(teamcity_version)' != ''">$(teamcity_build_tempDir)buildNuGet</PackageBuildPath>
			<PackageSourcePath>NuGet</PackageSourcePath>
		</PropertyGroup>

		<ItemGroup>
			<PackageSourceFiles Include="$(PackageSourcePath)**" />
			<PackageLibFiles Include="bin$(BuildConfiguration)$(AssemblyName).dll;bin$(BuildConfiguration)$(AssemblyName).pdb" />
			<OldDestinationFiles Include="$(PackagePath)$(AssemblyName).1.*.nupkg" Exclude="$(PackagePath)$(AssemblyName).$(build_number).nupkg" />
		</ItemGroup>

		<RemoveDir Directories="$(PackageBuildPath)" ContinueOnError="true" />
		<Message Text="Setting up the $(PackageBuildPath) directory will all the necessary files to create our package"/>
		<Copy SourceFiles="@(PackageSourceFiles)"  DestinationFiles="@(PackageSourceFiles->'$(PackageBuildPath)%(RecursiveDir)%(Filename)%(Extension)')" />
		<Copy SourceFiles="@(PackageLibFiles)"  DestinationFiles="@(PackageLibFiles->'$(PackageBuildPath)lib%(RecursiveDir)%(Filename)%(Extension)')" />

		<FileUpdate Files="$(PackageBuildPath)package.nuspec" Regex="version&gt;([^&quot;&lt;]*)&lt;/version" ReplacementText="version&gt;$(build_number)&lt;/version" />

		<Message Text="Creating the package"/>

		<NuGet PackageDir="$(PackagePath)" SpecFile="$(PackageBuildPath)package.nuspec" />
		<Message Text="Deleting previous package"/>
		<Delete Files="@(OldDestinationFiles->'$(PackagePath)%(Filename)%(Extension)')" ContinueOnError="true" />
	</Target>
</Project>

There are some conditions added to some of the properties so that I can run the build file locally (for testing) and so that it works as I want when TeamCity runs it.  Additionally, I am only copying the project assemblies from the bin folder, rather than all files, since I handle any dependencies via the nuspec file.

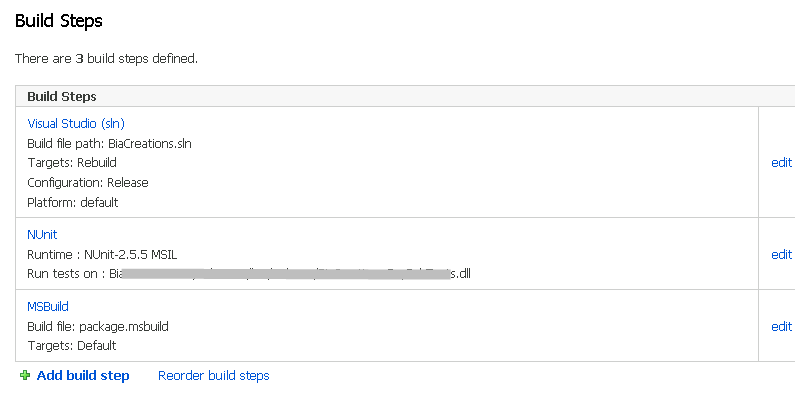
Next, I upgraded my Team City installation to version 6 so that I could take advantage of the multiple build runner feature.  I use the Visual Studio build runner to build my solution and just created a MSBuild runner that will create the NuGet package:

This pretty much sums up the changes I needed to make to have TeamCity produce a NuGet package every time it builds my library.  I’m fairly happy with this solution and so far it seems to be working well.  I want to thank Mark for his post on building NuGet files via MSBuild.  I hope this post helps those of you who want to incorporate this process with TeamCity.

Have JQuery Autocomplete behave like Google Suggest

For the current project I’m working on, I have a search box at the top of the site.  I wanted to add ajax suggestions (like Google Suggest) to it and thought it was a good exercise for the new JQuery UI 1.8 Autocomplete widget.  The autocomplete widget seems to be more suited for quickly searching pre-populated lists, but it offers nice extension points that allow you to easily customize its behavior.  Rather than having the control fetch a list of suggestions to just complete the word in the search box, I wanted the drop down to display a list of selections that when clicked, would navigate directly to the intended URL.

According to the documentation, you can pass in  three types of sources:

  1. A string representing a url that will return JSON data
  2. An array of strings (or objects)
  3. A callback that lets you define your own data

I’ll show you how to accomplish it using an array, but you can easily use one of the other methods as well.  If you want to use a different data source method, just make sure the result has the same object array signature as below.

1. Format the data source correctly

The autocomplete widget expects the source to be formatted as an array of strings or as an array of objects with specific properties.  Since we want to be able to assign a URL to each suggested item, we need to create an array of label/value pairs that represent each item:

var source = [{ label: 'My First Item', value: '/items/1' }, { label: 'My Second Item', value: '/items/2'}];

Now, when I pass that as the source to the autocomplete, we get items returned as a drop down menu.

2. Display the correct text for items

Unfortunately, when you hover over an item, it will replace the text in the search box with the value of the item:

To fix that behavior, the autocomplete widget allows you to hook into the focus event, that fires when an item in the drop down menu is hovered over/navigated to.  So we want to alter the behavior to use the label instead of value:

focus: function (event, ui) {
  $(event.target).val(ui.item.label);
  return false;
}

Now we get the label showing up in the textbox when we hover over an item:

3. Have the browser navigate to a URL when an item is selected

We’re almost there.  The last step that is needed is to wire up the item so that we navigate to the appropriate url when an item is selected:

select: function (event, ui) {
  $(event.target).val(ui.item.label);
  window.location = ui.item.value;
  return false;
}

A couple notes about what is happening in the select function. We set the value of the search box to the label value. This allows the control to auto complete in case the user gets anxious and wants to click Search before the browser redirects. After that, we instruct the browser to redirect to the selected item’s url.  Finally, we cancel the select event to make sure the default autocomplete behavior does not put the item value in the search box.

Putting it all together

We have the following:

$("#Query").autocomplete({
	source: [{ label: 'My First Item', value: '/items/1' }, { label: 'My Second Item', value: '/items/2'}]
	,focus: function (event, ui) {
		$(event.target).val(ui.item.label);
		return false;
	}
	,select: function (event, ui) {
		$(event.target).val(ui.item.label);
		window.location = ui.item.value;
		return false;
	}
});

UI Design – Part 2 of Rewriting a property management application

One of the main areas that I am focusing on with the rewrite of Property Center is the user interface (UI).   My goal is to remove unnecessary complexity from the UI; not only making everyday tasks faster to accomplish but also reducing the learning curve for new users.  I’ve been using Balsamiq Mockups to quickly hash out ideas rather than spending valuable time doing it with html or some other slow process.

Updating the header

For example, I’ve been wanting to update the header to include a way for people to search and quickly get things done.

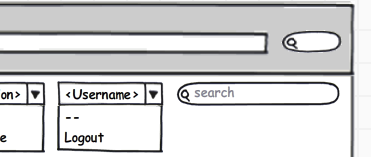
My first iteration looked like:

I still do like this layout because it puts everything in one row.  My main concern is that the drop downs would confuse people who are used to using links for user settings, logging out, etc.

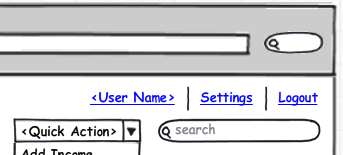
With the next iteration, I moved search and quick actions to their own row:

I think this helps simplify the structure and it uses familiar links for user settings and logging in/out.

The last iteration improves on the previous by cleaning up some unnecessary labels, etc:

Overall, I think this is a good compromise of form and functionality.  It gives novice users a familiar experience with links for logging in/out as well as providing a more advanced UI for those who want to perform quick actions.

Rewriting a property management application – Overview

This post begins a series of posts describing the process I am going through to rewrite and modernize my online property management application.  The end result will be relaunching the project as a rebranded application.

What are the goals?

There are many areas that need improvement from their current state.  A few of those areas are:

  • Database structure
  • UI Design and User Experience (UX) optimizations
    • Menu placement
    • Easier CMS user experience
    • Better tenant login experience
    • Ensure a consistent UI and use AJAX/popup dialogs in a controlled manner
  • Lacking features
    • Site search
    • Multiple payment processor options for tenant payment
    • REST based API
    • Data import/export
    • Postal mail options
    • Tenant credit screening
  • Performance tweaking
  • Strong documentation with page specific help
  • Pricing – I have exciting plans for revamping the pricing model.

What is the plan to get this done?

Technically speaking, the site will be upgraded to use Asp.Net 4, MVC2, NHibernate 3.x, StructureMap 3.x, and jQuery 1.4 running on Windows Server 2008 and Sql Server 2008.  I’ll be using Ayende’s fantastic NHProf tool to validate my NHibernate usage.

The database updates are nearly finished.  These updates include adding logical delete and other audit trail enhancements, full text search, and quite a few structural improvements which should translate directly to application speed improvements.  While designing an app from the model layer first is ideal, sometimes it leaves many desirable areas of improvement with relational db design and performance.  Upgrading an app is a different beast than starting from scratch, and I felt that the best place to start was to get the db in order.

I’ll soon begin to mock up the new user interface (UI), using Balsamq MockupsI’ve written about using Balsamiq in the past and still feel that it is one of the quickest and easiest ways to create useful wireframes.  I’ll add additional posts describing how I use Balsamiq to illustrate/prototype the major portions of the application.

Visit to Sweet Water Organics

This past Wednesday, I had the pleasure of exploring a hidden gem in Milwaukee.  Sweet Water Organics is a local company based in Bay View that is commercializing Will Allen‘s aquaponic system.  Aquaponics is the method of growing crops and fish together in a re-circulating system.  They had an “open house” and perch auction to not only generate some cash for the business but to also show off their digs.

Nicole and I hung out there for just under two hours.  Among others, we spoke with Jesse Hull, the man responsible for keeping Sweet Water operational and its lead horticulturist.  Not only did he blow me away with his knowledge of plants, our conversation ranged from the 5-second rule to using grow lights for heat transfer.  It was very stimulating to chat with him and I look forward to talking with him in the future.

Sweet Water Organics has great connections with many local chefs and restaurants.  They’re all about the miles to market mantra, where they try to provide local, sustainable ingredients.  They are looking to have retail operations in the future, that will allow you to buy fresh produce and fish directly from them.  Until that happens, you’ll be able to buy fish at upcoming auctions like the one they just had.

The vibe I felt while there was similar to how Lakefront Brewery felt in its early days.  There’s an excitement in the air and everyone knows that Sweet Water Organics is not only a benefit to the people but also the community.  Interesting to note, Lakefront provided a keg of delicious beer for all to enjoy while they mingled throughout the building.

Localize Asp.Net MVC Views using a LocalizedViewEngine

Localizing content is never an easy task.  Asp.Net tries to make localization and globalization easier with built in support for resources and cultures.  While I think that is a good start, I feel that the typical localization technique for asp.net applications is slightly misdirected and could be implemented easier.

In the past, I’ve put every sentence into a culture specific resource file.  Those sentences may be composite format strings or they could just be fragments.

This not only makes it difficult to rapidly develop, but can also create some rather difficult situations when special characters are introduced.  Think percent signs and currency symbols on Edit views.  Not to mention getting right-to-left languages like Arabic to display nicely.

A different approach

I propose a different solution to resource files that contain string fragments.  Rather than piecing together views with resource fragments, why not just have one view per language, per action.  Each language specific view can be identified by including culture names in their file name.

So if you have an Index action on the Home controller and want to support the default language (en-US) and Japanese (ja-JP), you would have the following files:

/Views/Home/Index.aspx
/Views/Home/Index.ja-JP.aspx

An added benefit to this method, is that it allows you to add new translations to your web application without requiring a recompile.  Along those lines, you can incrementally translate your site as budget and time allow.  If you haven’t added a translated view yet, the view engine will fall back on the default language view.

What are the downsides?

While this all sounds like a nice solution, there is one major downfall.  You duplicate the markup in many places.  So if or when you make a change in the future, you’ll have to go through each language specific view and make the change there as well.  That’s a lot to ask of a developer, but I feel that this method outweighs trying to piece together fragments and maintain text outside of the view.

How is this accomplished?

As everyone is aware, Asp.net MVC allows developers to extend the framework rather easily.  To allow for language specific views, we just need to tweak the WebFormViewEngine to first check for the view of the CurrentUICulture.  If that page is not found, let the view engine continue as it normally would.

public class LocalizedWebFormViewEngine : WebFormViewEngine
{
public override ViewEngineResult FindPartialView(ControllerContext controllerContext, string partialViewName, bool useCache)
{
string localizedPartialViewName = partialViewName;
if (!string.IsNullOrEmpty(partialViewName))
localizedPartialViewName += “.” + Thread.CurrentThread.CurrentUICulture.Name;

var result = base.FindPartialView(controllerContext, localizedPartialViewName, useCache);

if (result.View == null)
result = base.FindPartialView(controllerContext, partialViewName, useCache);

return result;
}

public override ViewEngineResult FindView(ControllerContext controllerContext, string viewName, string masterName, bool useCache)
{
string localizedViewName = viewName;
if (!string.IsNullOrEmpty(viewName))
localizedViewName += “.” + Thread.CurrentThread.CurrentUICulture.Name;

string localizedMasterName = masterName;
if (!string.IsNullOrEmpty(masterName))
localizedMasterName += “.” + Thread.CurrentThread.CurrentUICulture.Name;

var result = base.FindView(controllerContext, localizedViewName, localizedMasterName, useCache);

if (result.View == null)
result = base.FindView(controllerContext, viewName, masterName, useCache);

return result;
}
}

To specify that you would like to use the LocalizedViewEngine, modify the Application_Start method in your Global.asax.cs file to be similar to:

protected void Application_Start()
{
AreaRegistration.RegisterAllAreas();

RegisterRoutes(RouteTable.Routes);

ViewEngines.Engines.Clear();
ViewEngines.Engines.Add(new LocalizedWebFormViewEngine());
}

That’s it.  I’m interested in hearing your thoughts about this method.